Field note / December 27, 2024
Technical articleBasics of Pre-request Scripting in Postman
Learn how to enhance your API testing workflows with Postman’s pre-request scripts. This guide covers dynamic data generation, making external API calls, using pm.sendRequest() with Promises, and leveraging Postman’s packaging system for organized scripting—all tailored for beginners with JavaScript and Postman knowledge.
Published on December 27, 2024, by Roman Ďurek
Postman is a widely used tool for API testing, offering robust features that empower developers and testers to streamline their workflows. In this guide, we’ll dive into Pre-request Scripts, a powerful feature that allows you to dynamically prepare requests before sending them. This tutorial is designed for readers with beginner-level knowledge of JavaScript and Postman, covering topics such as:
- Adding dynamic data like timestamps and random values to your requests.
- Making external API calls using pm.sendRequest() and understanding how its updated behavior as a Promise can simplify your workflows.
- Organizing reusable functions for better script management.
- Introducing Postman’s new packaging system to organize and share your scripts efficiently.
By the end of this guide, you’ll have a strong foundation in using pre-request scripts, enabling you to handle complex scenarios with ease and improve the efficiency of your API testing workflow.
Prerequisites
Before diving into this tutorial, you should have a basic understanding of both JavaScript and Postman. Specifically, you should be familiar with:
- Basic JavaScript concepts such as variables, functions, and promises.
- Sending requests, checking responses, and understanding basic Postman functionality like using console, setting headers, query parameters, and body data.
If you’re new to Postman or JavaScript, we recommend going through introductory resources first. Once you’re comfortable with the basics, you’ll be ready to explore more advanced Postman scripting techniques like the ones covered here.
To practice these concepts, you can use Postman’s official Echo service endpoints:
- [GET] https://postman-echo.com/get
- [POST] https://postman-echo.com/post
What are Pre-request Scripts?
Pre-request scripts are JavaScript snippets that execute before the main request is sent. They are commonly used to prepare data, set up variables, or make additional API calls. Below are examples showcasing key use cases for pre-request scripts.
1. Adding Dynamic Timestamps
Generate a timestamp and include it in a request header.
// Generate a timestamp
const timestamp = new Date().toISOString();

// Add it to a custom header
pm.request.headers.add({
  key: "X-Timestamp",
  value: timestamp,
});

console.log("Timestamp added:", timestamp);
GET Postman Echo endpoint will always return headers in response from request, so you should now see our header we added in pre-request script in response:
"x-timestamp": "2024-12-27T10:25:59.106Z",
2. Generating Random Data
Testing APIs often requires dynamic data like random usernames or IDs. Here's how you can create a random email and save it as a variable:
// Generate a random email
const randomEmail = `user_${Math.floor(Math.random() * 10000)}@example.com`;

// Save the email to a collection variable
pm.collectionVariables.set("randomEmail", randomEmail);

console.log("Random email generated:", randomEmail);
Postman also provides built-in random generators for use directly in parameters, headers, or body:
{
  "id": "{{$guid}}", // 8394666d-6e4c-4869-ac81-35c12db3cd3c
  "city": "{{$randomCity}}", // "North Stefanie"
  "color": "{{$randomColor}}", // "black"
  "uuid": "{{$randomUUID}}", // "f8c2139d-8d75-4b23-ad38-c4704c1a0179"
  "randomWord": "{{$randomWord}}" // "Identity"
}
To use dynamic variables in pre-request or post-response scripts, use pm.variables.replaceIn(). For example, to enter a random first name, use pm.variables.replaceIn(). Note that variable names are case-sensitive.
const randomId = pm.variables.replaceIn("{{$guid}}");
const randomFirstName = pm.variables.replaceIn("{{$randomFirstName}}");
const randomCity = pm.variables.replaceIn("{{$randomCity}}");
const randomColor = pm.variables.replaceIn("{{$randomColor}}");

console.log(randomId); // 11cdb8f3-c1d9-4121-a6b1-5c2bebf791f8
console.log(randomFirstName); // Shanon
console.log(randomCity); // West Magalistad
console.log(randomColor); // yellow
3. Making External API Requests
Sometimes, you need to fetch data or tokens from external APIs before making the main request. The pm.sendRequest() function lets you perform these additional requests.
// Example: Fetching an Authentication Token
const randomEmail = `user_${Math.floor(Math.random() * 10000)}@example.com`;

pm.sendRequest(
  {
    url: "https://api.bwrd.eu/fake-token",
    method: "POST",
    header: {
      "Content-Type": "application/json",
    },
    body: {
      mode: "raw",
      raw: {
        username: randomEmail,
        pass: "pass",
      },
    },
  },
  (err, response) => {
    if (err) {
      throw new Error(`Request failed: ${err.message}`);
    }

    if (response.code !== 200) {
      throw new Error(`Non-200 response: ${response.json().error}`);
    }

    const token = response.json().token;
    pm.collectionVariables.set("token", token);
    console.log("Auth token saved:", token);
  },
);
Check the Postman Console to verify that the token was saved:
Auth token saved: 1126396a-98af-493d-844a-4ad2a859b2ac
4. Chaining Requests Using Promises
When working with multiple API calls, chaining requests ensures that data flows seamlessly between them. Below, we demonstrate how to chain two API requests:
So our test screnario will be:
- Call POST /fake-token endpoint in pre-req script to get scope and token
- Call GET Postman echo endpoint in pre-req script with query params like language, value and stored "scope" from first request
- Call POST Postman echo (https://postman-echo.com/post) endpoint with bearer token auth and data from GET request this is our main request
Important note: Keep in mind that you will never use any of sensitive variables like tokens or scopes as query parameter in other request. I just wanna demonstrate how you can add any variable dynamically to request.
Step 1: Write Helper Functions
Use JavaScript Promises to create reusable request functions:
const getToken = () => {
  return new Promise((resolve, reject) => {
    pm.sendRequest(
      {
        url: "https://api.bwrd.eu/fake-token",
        method: "POST",
        header: {
          "Content-Type": "application/json",
        },
        body: {
          mode: "raw",
          raw: {
            username: `user_${Math.floor(Math.random() * 10000)}@example.com`,
            pass: "pass",
          },
        },
      },
      (err, response) => {
        if (response.code !== 200) {
          reject(
            `Error in getToken request - Non-200 response: ${response.json().error}`,
          );
        } else resolve(response.json());
        // we will return all from getToken response
      },
    );
  });
};

// we wanna to add scope param which this function will accept
const getData = (scope) => {
  return new Promise((resolve, reject) => {
    pm.sendRequest(
      `https://postman-echo.com/get?language=en&value=321&scope=${scope}`,
      (error, response) => {
        if (response.code !== 200) {
          reject(
            `Error in getData request - Non-200 response: ${response.json()}`,
          );
        } else resolve(response.json());
        // we will return all from getData response
      },
    );
  });
};
Step 2: Chain the Functions
Call these helper functions and save the results to Postman variables:
getToken()
  .then(async (tokenData) => {
    // save scope and token as variable, so we can use it later
    pm.collectionVariables.set("scope", tokenData.scope);
    pm.collectionVariables.set("token", tokenData.token);
    // call getData function with "scope"  from /fake-token
    const data = await getData(tokenData.scope);
    // save data from response as variables
    pm.collectionVariables.set("language", data.args.language);
    pm.collectionVariables.set("value", data.args.value);
  })
  .catch((error) => console.error(error));

// OR WITH SECOND ALTERNATIVE IF YOU WANT YOU CAN ADD ONE MORE .then()
getToken()
  .then(async (tokenData) => {
    pm.collectionVariables.set("scope", tokenData.scope);
    pm.collectionVariables.set("token", tokenData.token);
    getData(tokenData.scope);
  })
  .then((data) => {
    pm.collectionVariables.set("language", data.args.language);
    pm.collectionVariables.set("value", data.args.value);
  })
  .catch((error) => console.error(error));
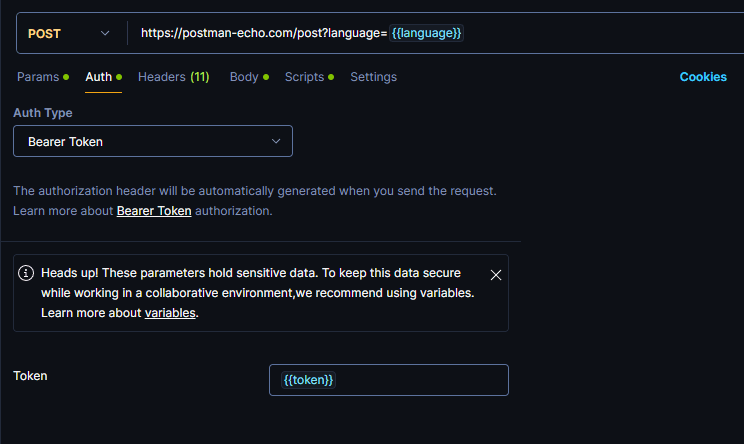
Last thing to do is just add variables we store into main request POST Postman Echo.
We want to:
-
add language as query param
- In row where we have endpoint add at the end query parameter language with dynamic value of language
-
add token as Bearer token in Auth
- Go to Auth tab
- Select Bearer Token as Auth type
- into Token add dynamic value of our token
- add params to body
- Go to tab Body
- select -> raw and JSON
- lets add to json body object with multiple params
    {
    "id": "{{$guid}}",
    "city": "{{$randomCity}}",
    "color": "{{$randomColor}}",
    "uuid": "{{$randomUUID}}",
    "randomWord": "{{$randomWord}}",
    "scope": "{{scope}}",  // <- this way you add string from variable
    "value": {{value}} // <- this way you add number from variable
}
Send request. This is how response from POST Postman Echo will look like. Check that all values we added are in response
// RESPONSE
{
  "args": {
    "language": "en" // <- language we add in query params
  },
  "data": {
    // <- JSON body we send in our request
    "id": "79cb7d73-23e6-4f7d-83f3-255da7e5b6c1",
    "city": "Port Gabemouth",
    "color": "grey",
    "uuid": "867e18a9-d282-4930-a2d2-352e39c2f30b",
    "randomWord": "Account",
    "scope": "bwrd:read_fake"
    "value": 321
  },
  "files": {},
  "form": {},
  "headers": {
    "host": "postman-echo.com",
    "x-request-start": "t1735845639.809",
    "connection": "close",
    "content-length": "209",
    "x-forwarded-proto": "https",
    "x-forwarded-port": "443",
    "x-amzn-trace-id": "Root=1-6776e707-4184879f17324f91663b4609",
    "content-type": "application/json",
    "authorization": "Bearer d4d56dc1-22cd-4004-b0af-107380ea316b", // <- Auth token we added in our request
    "user-agent": "PostmanRuntime/7.43.0",
    "accept": "*/*",
    "cache-control": "no-cache",
    "postman-token": "b5fa94d8-5b13-4f19-b3be-af0b3438099b",
    "accept-encoding": "gzip, deflate, br",
    "cookie": "sails.sid=s%3Ablv5v-w8N0KDoQUDKo7sDjmLmCeyMshs.uG%2B6Iv7xesM78HqLu9ybTdeUJRcbubY5gvimfaJNA8A"
  },
  "json": {
    "id": "79cb7d73-23e6-4f7d-83f3-255da7e5b6c1",
    "city": "Port Gabemouth",
    "color": "grey",
    "uuid": "867e18a9-d282-4930-a2d2-352e39c2f30b",
    "randomWord": "Account",
    "value": 321
  },
  "url": "https://postman-echo.com/post?language=en"
}
5. Methods
Managing multiple functions within pre-request scripts can become cumbersome and difficult to maintain. To streamline this process, you can store these functions as collection variables and reference them by name. This approach keeps your pre-request scripts cleaner and more organized.
Here’s how you can achieve this by creating a JavaScript file (methods.js) to define the required functions, such as getToken and getData. Writing these functions in an external file allows for better editing and reusability.
// methods.js
({
  getToken: () => {
    return new Promise((resolve, reject) => {
      pm.sendRequest(
        {
          url: "https://api.bwrd.eu/fake-token",
          method: "POST",
          header: {
            "Content-Type": "application/json",
          },
          body: {
            mode: "raw",
            raw: {
              username: `user_${Math.floor(Math.random() * 10000)}@example.com`,
              pass: "pass",
            },
          },
        },
        (err, response) => {
          if (response.code !== 200) {
            reject(
              `Error in getToken request - Non-200 response: ${response.json().error}`,
            );
          } else resolve(response.json());
        },
      );
    });
  },
  getData: (scope) => {
    return new Promise((resolve, reject) => {
      pm.sendRequest(
        `https://postman-echo.com/get?language=en&value=321&scope=${scope}`,
        (error, response) => {
          if (response.code !== 200) {
            reject(
              `Error in getData request - Non-200 response: ${response.json()}`,
            );
          } else resolve(response.json());
        },
      );
    });
  },
});
Steps to Use These Functions in Postman:
- Copy the entire content of the methods.js file.
- Navigate to your collection in Postman and open the Variables tab.
- Add a new variable named methods
- Paste the copied code into the Initial Value and Current Value fields for the methods variable.
Calling Methods in a Pre-request Script
Once the methods are stored as a collection variable, you can easily invoke them in your pre-request scripts:
const methods = eval(pm.collectionVariables.get("methods"));

methods
  .getToken()
  .then((tokenData) => {
    pm.collectionVariables.set("scope", tokenData.scope);
    pm.collectionVariables.set("token", tokenData.token);
    methods.getData(tokenData.scope);
  })
  .then((data) => {
    pm.collectionVariables.set("language", data.args.language);
    pm.collectionVariables.set("value", data.args.value);
  })
  .catch((error) => console.error(error));
From this point all steps are same as in point 4. You just need to add variables into main request.
This approach eliminates boilerplate code from the pre-request scripts, making them cleaner and more readable. By centralizing the function definitions in a single variable, you also reduce redundancy and improve maintainability.
6. NEW Postman packages
In newer versions of Postman v11.23.3+ we can also use packages. This will work the same way as if we store our functions to variables in point 5. You can add commonly used scripts and tests to packages in your team's Package Library, and reuse them in your personal, private, and team workspaces.
Important note: The number of packages you can store in the Package Library depends on your Postman plan. With free plan you are allowed to make 3 packages.
You can import packages into the Pre-request and Post-response tabs.
Add a new package
To add a new package, do the following:
- Open an HTTP request, collection, or folder, then select the Scripts tab.
- Select either the Pre-request or Post-response tabs.
- Open the pane to the right of the code editor, and select Open package library.
- Select Pin collection icon New Package.
- Enter the name, summary and code. We will demonstrate same example is we did in point 3 of this blog.

// Use module.exports to export the functions that should be
// available to use from this package.
// module.exports = { <your_function> }

// Once exported, use this statement in your scripts to use the package.
// const myPackage = pm.require('<package_name>')

const getRandomNumber = () => {
  const randomNumber = Math.floor(Math.random() * 100000);
  return randomNumber;
};

const getCurrentDate = () => {
  const date = new Date();
  return date;
};

const randomEmail = () => {
  const randomEmail = pm.collectionVariables.replaceIn("{{$randomEmail}}");
  return randomEmail;
};

module.exports = { getRandomNumber, getCurrentDate, randomEmail };
- Click Create to save the package in your Package Library.
Once a package is created, you can import and use it in your Pre-request or Post-response scripts. Here’s how to use the example package:
// Import the package using pm.require
const bwrd = pm.require("bwrd-random");

// Use the functions from the package
const randomNumber = bwrd.getRandomNumber();
const currentDate = bwrd.getCurrentDate();
const randomEmail = bwrd.getRandomEmail();

// Log the results
console.log(randomNumber); // Example: 28035
console.log(currentDate); // Example: 2025-01-03T16:45:24.047Z
console.log(randomEmail); // Example: [email protected]
Advantages of Using Postman Packages
- Centralized Management: Update logic in a single place, and it’s reflected wherever the package is used.
- Reusability: Write code once and use it across all relevant scripts, reducing duplication.
- Team Collaboration: Share packages easily with your team for consistent scripting practices.
- Improved Maintainability: Simplify updates and debugging by consolidating functionality.
Postman packages represent a significant step forward in API testing and development. By organizing your reusable logic into packages, you can ensure cleaner scripts, better collaboration, and reduced maintenance overhead in both individual and team projects.
7. NEW pm.sendRequest() now returns Promise
In newer versions of Postman v11.23.3+ pm.sendRequest() returns a Promise directly. This eliminates the need for a callback function:
So now let's see ho we can chain our request together and pass data from first to other second one. We'll also add very simple error handling just to showcase how to do it with this approach.
// FIRST REQUEST TO GET TOKEN + SIMPLE ERROR HANDLING

const getToken = await pm.sendRequest({
  url: "https://api.bwrd.eu/fake-token",
  method: "POST",
  header: {
    "Content-Type": "application/json",
  },
  body: {
    mode: "raw",
    raw: {
      username: `user_${Math.floor(Math.random() * 10000)}@example.com`,
      pass: "pass",
    },
  },
});

if (getToken.code !== 200) throw new Error(`Error in getToken request`);

const { scope, token } = getToken.json();

if (!scope || !token) throw new Error("Invalid token or scope");

pm.collectionVariables.set("scope", scope);
pm.collectionVariables.set("token", token);

// SECOND REQUEST TO GET DATA + SIMPLE ERROR HANDLING

const getData = await pm.sendRequest(
  `https://postman-echo.com/get?language=en&value=321&scope=${scope}`,
);

if (getData.code !== 200) throw new Error("Error in getData request");

const data = getData.json().args;
pm.collectionVariables.set("language", data.language);
pm.collectionVariables.set("value", data.value);
From this point all steps are same as in point 4. You just need to add variables into main request.
In this guide, we’ve covered the essentials of using Pre-request Scripts in Postman, which allow you to dynamically prepare requests before they are sent. By the end of this tutorial, you should feel confident writing basic pre-request scripts to automate and enhance your API testing workflow.
By using Pre-request Scripts, you can make your API testing in Postman not only more efficient but also much more dynamic. Whether it’s preparing data, making external requests, or handling complex scenarios, Postman’s scripting capabilities allow you to customize and automate your workflow to fit your exact needs.
Next Steps
Now that you’re familiar with the basics, consider experimenting with more advanced scripting techniques.
Postman’s scripting capabilities are vast, and by practicing regularly, you’ll become more proficient in leveraging them to handle complex testing scenarios.
If you’d like to continue learning, explore additional Postman tutorials or dive deeper into JavaScript concepts. With practice, you’ll unlock Postman’s full potential and become an API testing expert.
Happy testing! 🚀